Showing posts with label experiment. Show all posts

Wednesday, August 8, 2012

Shark Cupcakes

This is a shark cupcake. Kind of pitiful looking, but you get the idea. One of my friends at work sent me a link to these cute shark cupcakes and I told her that I would attempt to make them for her. The cupcakes are filled with raspberry jam, so when you cut them open, it's like blood is oozing out of them. 
Here's a destroyed shark cupcake. As you can see, when you only have chocolate cake mix at home, you cannot see the oozing raspberry jam blood come out of the cupcake.
I cored the cupcakes using a pastry tip.  It works extremely well for this application. 
Lazy Step #1-This actually might be lazy step 2, since I used cake mix for the cupcake. So I zapped this jar of jam into the microwave for a couple of seconds until it was a runny consistency and then dropped it into the cupcake holes.
Here's a picture of the jam-filled cupcakes.  
Lazy Step #2-I took the lazy route for these cupcake frosting. I do not like frosting on cupcakes (I've never did since pre-school), so I do not go out of my way to make a homemade frosting.  I bought the Duncan Hines Frosting creations and the blue cotton candy flavored powder (because it was blue) against my better judgement. Then when I got home I decided that chocolate cupcakes filled with raspberry jam probably would not taste good with cotton candy flavored frosting. So I just added some blue food coloring to the frosting.
Lazy Step #3-I bought some sugar sheets from the craft store for the shark fins. 1)I have never made or worked with fondant in my life; 2) I did not want to spend my whole day making shark cupcakes.
Here's the shark pack. I think that fondant would have been a better choice for the shark fins. But you get the gist of it. 

Wednesday, June 20, 2012

Liquid Cheesecake and Saran Wrap Mishap

I'd like to blame this mistake on "pregnancy brain" but it's more of a "stupidity" mistake.
Sidenote-I think I'm still functioning at 90% of my usual brain/memory capacity, but the other week, I did something really dumb. Mike let me choose the Redbox movie to rent while he dropped the groceries off at the car. He picked me up and asked, "So what movie did you select?" and I answered with, "The Vow," it's a Nicholas Sparks book.
Mike gave me a funny look and said, "Didn't we watch that movie?" Maybe all Nicholas Sparks movies  blend together-after all this is the second movie Rachel McAdams and Channing Tatum have been in.  Or maybe it was a pretty average unmemorable movie that I forgot I watched.  Whatever the case, I felt pretty silly and will probably not be in charge of movie rental selections in the future.
Back to my food mishap.  I just borrowed Christine Tosi's "Milk Bar" cookbook from the library and I wanted to try to make one of her recipes. Last year during our trip to New York, Mike and I visited the Milk Bar. I thought that the baked goods were super creative and was excited when the book came out.
Well, since I had bought a 3-lb block of cream cheese from Sam's Club to bake a cheesecake for a friend's birthday, I had extra cream cheese and decided to test out the "Liquid Cheesecake" recipe. It's pretty much an under-baked cheesecake that can be incorporated into other desserts as a filling or frosting.
The recipe required me to line a pan with plastic wrap. Yes, red flags popped up in my brain, but then I thought, "hmm....saran wrap can be used in the microwave, this cheesecake is baked at 300F for a short amount of time...not so bad."  Still my gut instinct told me, "Have you ever seen anyone place saran wrap in the oven?"  So against, my better judgement, I lined a pan with saran wrap and filled it with the cheesecake mixture.
Big Mistake. Luckily, since I was second-guessing myself, I looked inside the oven after a few minutes of bake time and quickly took the pan out.  So, no oven fire there!
Yes, the saran wrap melted.  Yes, I'm a dummy.  Yes, I usually have more common sense than this.  I then flipped through the book and saw that in the beginning of the book, the author explains that the "plastic wrap" that she is referring to is heavy duty plastic wrap. 
Here's the melted mess. 
Note to self-Never place saran wrap in the oven.  
Note to Self 2-Read the Introductory chapter of books before you follow recipes, usually there is a section that recommends what kind of ingredients and equipment you should use.  

Monday, June 18, 2012

Baked Kale Crisps

I had bought a beautiful bunch of kale the other day and did not want it to go to waste. So, I decided to make some baked kale crisps.

I cut the kale into smaller pieces and cut out the tough inner stem.  Then washed and dried* the leaves. I made sure that the leaves were extremely dry so that the leaves would dry evenly in the oven.
I placed the leaves in a plastic bag, added a tablespoon or so of oil and tried to coat the leaves with oil Then placed them on a cookie sheet and baked them in the oven  at 350F for about 10 minutes. I carefully watched the oven to make sure that the kale did not burn.
Once out of the oven, I lightly salted the kale chips. They were a quick, cheap, and healthy snack to make!

Tuesday, May 3, 2011

Sweet Experiments~ Ricotta Cheesecake and Butterscotch Pot de Creme

The other week, I bought a 3 lb tub of ricotta cheese and made lasagna. Initially, I was planning on just using cottage cheese in my lasagna, but Mike said, "What?  Lasagna with ricotta cheese tastes so much better than lasagna with cottage cheese."
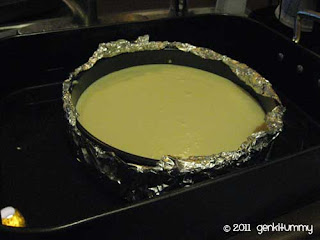
I had a lot of ricotta cheese left, so I decided to attempt to make a cheesecake.  My mom had bought me a set of spring form pans a while back, and this was the first time I put them to use.  I decided to try Giada DeLaurentis' ricotta cheesecake recipe.
The flavor of the cheesecake was delicious. There was a hint of honey in the smooth creamy cheesecake. Unfortunately, that's what my final product ended up looking like (and I served it anyways).  I was taking a nap at home and I instructed a friend to take the cheesecake out of the oven when the timer buzzed.  Well the pan and the waterbath was too hot for my friend to handle, and she ended up dropping the pan into the sink.  We were able to salvage some of the cheesecake.  Oh well, I guess that means that I just have to try to make it again 


Pot de Crème

I’ve been obsessed with pot de crème after I had a butterscotch pot de crème at Neighborhood Services earlier this year. It was served in a cute little glass jar, which I now refer to as “the pot of goodness.” The serving size was too rich and large to be a single portion, but perfect for sharing.
Pot de crème is basically a heavy cream custard consisting of egg yolks, heavy cream, milk, and sugar. Man, rattling off all the ingredients just made me gain a couple of pounds.
So I decided to test out a pot de crème recipe. I surfed the Internet and found a butterscotch pot de crème recipe.

The final result was a really sweet slight burnt caramel flavored pot de crème. It made me start thinking, “What is butterscotch flavor?” Can you actually make a butterscotch flavor? I feel that butterscotch falls into the “caramel” flavor camp. What do you think?
At the moment, pot de crèmes are one of my favorite desserts. If I owned a small cute-sy dessert shop, I would serve small portions of pot de crème so people could have a small indulgence.

Thursday, April 7, 2011

Korean Mandoo Making

Korean mandoo was one of the recipes I wanted to attempt to perfect this year.  It is time-consuming to make, but you can make a lot of it and either give it away or freeze it for future dinners.  
Chinese potsticker wrappers(~$1for the pack) and Korean mandoo wrappers (~$3.50)
Buying mandoo wrappers at the Asian market is a tricky process.  Some of them say "potsticker wrappers," "wonton wrappers," or "shumai wrappers."  Some contain eggs, some contain only wheat flour, while others also contain rice flour. 
In this past season of "Top Chef" one of the contestants purchased the incorrect wrapper, and ended up steaming wrappers that were supposed to be boiled.  Be careful when purchasing the wrappers.   
I gambled when I purchased the wrappers and hoped that they would work for mandoo making based on the pictures on the packaging. 
Sweet potato noodles.
Cabbage, chives, chopped round onion
Crumbled drained tofu
Mixture of ground pork, tofu, noodles, chives, cabbage, onion, raw eggs, garlic, ginger, sesame oil, and salt and pepper.  I did not measure the ingredients, I just arbitrarily added amounts of ingredients, skewed to a filling containing more vegetables than meat. 
I like to place a lot of filling into the wrapper.
Frying the mandoo. We first pan fried the mandoo in oil, then added water to the pan and "steamed" the mandoo. 

Both the potsticker wrappers resulted in a similar product. The Korean mandoo wrappers were a little bigger than my mandoo press, so there was extra noodle edge. The wrapper tastes were similar, so I would personally buy the cheaper wrapper from now on. 

Mike and I enjoyed the mandoo, but as we started eating the frozen mandoo a couple more times, our enjoyment started to wane.  At the moment, we prefer Ajinomoto's frozen gyoza much more than my mandoo. 
If I am going to pursue Korean mandoo making this year, 1)I have to make less mandoo, 2) invite people over to eat the mandoo, or 3)or develop a super awesome flavor profile for my mandoo that we enjoy a lot more.

Sunday, November 21, 2010

(The Best) Rocky Road Brownies

A couple weeks ago, I was craving something really rich and chocolatey.  I also was eating those jet-puffed mini marshmallows by the handful and wanted to stop myself from eating all those empty Calories of sugar and gelatin. So I decided to instead empty sugar-laden Calories from marshmallows and chocolate.  This led to the creation of this super awesome and delicious Rocky Road Brownies.  I usually do not rave about my experiments in the kitchen, but these were some darn good brownies. 

As some of you may know, my and Mike's co-workers and friends reap (sometimes cringe at) the benefits of all my baking experiments.  My co-workers get the Tier 1 experiments (come on, I work with a bunch of Food Scientists, some of whom have superb palates) and Mike's co-workers receive the Tier 2 experiments.  I thought that these brownies were no question in the Tier 1 category and since I made a huge pan of them, Mike's co-workers got to sample them too.

Ingredients:
1 box brownie mix (for a 9x13"pan, chose the fudgy brownie option).
--I used a cheap box of Duncan Hines Brownie Mix. The kind that sells for $1 on sale.
1 lb of dark chocolate
--I used a mixture of Dove dark chocolate promises and Ghirardelli 60% cacao bittersweet chips
~2 cups of miniature marshmallows + an extra handful if you really like marshmallows
1.5 cups of crisp rice cereal (i.e. Rice Krispies)
1/2 peanuts (optional)
-I used slightly sugared peanuts that had a candy crunch on them

Recipe:
1. Mix and make the brownie mix according to the box's chewy brownie option. I always reduce my brownie cook time because I like fudgy moist brownies instead of dry brownies. If the box says "27-30 minutes" I usually set my timer for 22 minutes and check it with a toothpick.  If the toothpick come out goopy with wet batter, keep it in longer.
2.(you can skip this step, I just did it for fun). Shut off your oven heat, and with the remaining heat, throw some marshmallows on the top of the baked brownies and let the marshmallows heat up and expand. I did this only for a couple of minutes.
3. In a double boiler, melt your chocolate. (Or you can do it the "Lauren Lazy Way" and dump the chocolate in a pot, turn the heat on to a low temperature (the lowest setting), and constantly stir the chocolate with a heat resistant spatula. 
4.  Once all the chocolate has melted, dump in the remaining marshmallows, the nuts, and the crisp rice cereal.
5. Quickly stir everything together and then gently spread it atop the baked brownie.
6. Let the brownie sit at room temperature and then put it in the refrigerator to chill (Or by a window with chilly night air blowing through it).
7. Cut the brownies up into 1-1.5" pieces and serve or package them. 


This picture does not do the brownie justice. It has a rich chocolate fudge taste and is composed of a multitude of varying textures (crunchy, chewy, soft, gooey). This recipe definitely will make it into my "must keep" recipe book. I would like to make it at least one more time to verify that it wasn't just a fluke chance that these came out tasty. 

Friday, November 19, 2010

Cooking Experiment~Loosey Goosey

Here's Mike's Experiment. This experiment was all Mike's doing.  For the longest time he has wanted to make a  "loosy goosey" "juicy lucy"  burger, which is essentially placing and sealing cheese into raw hamburger meat, and then cooking it.
Mike filled the burger with shredded sharp cheese.
We grilled onions and burgers after grilling that frozen pixzza. 
Here's the makeshift burger. I think we need to buy larger buns.
Here's a cross section cut of Mike's burger.  Look at all that oozing cheese!

Mike really enjoyed his burger and said he that he would definitely make it again. Too bad we do not cook burgers very often at home.  I think about 50% of the meals we eat at home are vegetarian. 

Wednesday, November 17, 2010

Cooking Experiment~Grilling Frozen Pizza

This is a cooking experiment that Michael wanted to try. Most of the experiments conducted in our kitchen are done because of my curiosity.  Okay, I take this back, I was like an older child and  planted the thought in Mike's head and convinced him that it would work.  Just like how my sister told me that if I stuck kimi balls  in my ears, it would block out sound. Or when she taught me that if I break my crayons in half, I'd have more.   
On a lazy weekend afternoon, we decided to grill a frozen self-rising pizza.  You've heard of grilling home-made pizza on a grill, but we decided, "hey, why not grill a frozen pizza on the grill?"
Think about it, a grill is essentially an outdoor oven.  Once you close the grill cover, you have an enclosed chamber of  heat.  The difference between an oven and a grill is that in an oven the heat is sourced from the roof of the oven, in a grill, the heat comes from the bottom. Hot air rises, making it a vessel to cook a pizza in.
The main difference I thought we would see is that we would not burn the top of the pizza because the grill did not contain a direct heat source above the pizza.  There was a greater chance for us to burn the crust because of the direct heat coming from the bottom of the grill.
We had to make sure that the pizza was not above a direct flame (this was Mike's brilliant thought). So we started up the grill (with the lid closed) and tried to get it as hot as possible. Once the grill was heated, we quickly placed the pizza on the side of the grill that did not have a direct flame underneath it. We shut the lid and did not open it, even to peek at the pizza. 
I think the directions on the box said to preheat the oven to 400F and bake for 22-25 minutes. We ended up grilling the pizza in about 15 minutes (that's when there was a faint burnt odor coming from the grill). 
Here's a picture of the uncooked pizza.
Here's the final product. Not bad, huh? (part of the bottom crust is burnt, but you cannot see that in the picture). Mike said that he would make this again because he liked the grilled flavor on the pizza. I liked it because 1) it prevented our apartment from heating up because of the oven heat; 2)the cook time for the pizza was faster than in our oven.

Saturday, October 16, 2010

How to Cook Massive Tons of Bacon...and then bacony-cornbread

A few weeks ago we had some friends over for dinner and a game night and decided that we would have a baked potato bar.  Of course to make a baked potato bar complete, you must have bacon bits.  So, one Saturday I spent the morning cooking bacon bits. Okay, I exaggerated, I didn't cook TONS of bacon, just two packages of bacon. 
If you are ever placed in the situation in which you have to cook a lot of bacon, the best way to cook it is in the oven.   That's one of the many tips that I learned while attending culinary school at KCC.  Cooking bacon in the oven is quick and easy and also decreases the chances of being splattered by bacon grease. 
Make sure that you do not lay the bacon flat on the pan. If you do, your finished product will be flat sticks of bacon.
Bake the bacon in the oven for ~15 min at 400F.  The amount of bake time varies, depending on how crisp you like your bacon. 
I was moderately grossed out at the amount (it was over 1 cup) of bacon grease that resulted from all my bacon cooking.  At the same time I was intrigued at this source of saturated fat. I started thinking, "hmmm....butter is a saturated fat....what if I replaced butter with bacon grease in a recipe?"
I decided to use all of my bacon grease to make a "butterless" cornbread.  Mike was eying out my concoction with curious and concerned glances (man, he has no faith in my kitchen experiments).  I started to doubt myself and thought, well if this is going to be a fail, it might as well be an epic fail. I proceeded to then add my newly made bacon bits to a part of the cornbread. 
Here's the resulting product.  My "Butterless Cornbread."  I paired this bread with a sweet maple whipped butter.  It actually tasted pretty good and my friends who ate it said they enjoyed it.